.png)

Full screen: Use Ctrl + Show Windows to instantly capture everything visible on your Chromebook.
Selected area: Use Ctrl + Shift + Show Windows to capture only a specific section.
More control: The Screen Capture tool supports full-screen, partial, window captures, and screen recording.
A Chromebook can capture the full screen, a selected area, or a specific window in seconds. The right shortcut depends on the type of screenshot required. ChromeOS also includes a built-in Screen Capture tool, which gives more control over the capture area and screen recording options. The steps below cover the main methods, including standard Chromebooks, touchscreen models, and external keyboards.
The fastest method uses the Show Windows key. This key usually has a rectangle icon with two short lines beside it and sits along the top row of the keyboard.
First, open the page, app, document, or image that needs a screenshot. Hold the Ctrl key, then press the Show Windows key once. ChromeOS captures the entire visible screen at once. A small notification appears near the lower-right corner after the capture.
The screenshot normally saves in the Downloads folder. Open the Files app from the shelf or app launcher, then select Downloads to find the new image. The file usually carries a name that starts with ‘Screenshot’ and includes the date and time.
A selected-area screenshot works well when a full desktop contains extra information that does not need a place in the image.
Hold Ctrl + Shift, then press the Show Windows key. The screen changes slightly, and a crosshair appears. Click and drag across the part of the screen that needs to be captured. Release the mouse button after the desired area has a clear border.
ChromeOS saves only the selected section. This method can capture a paragraph, image, browser section, chart, or any other visible part of a page without extra desktop content.
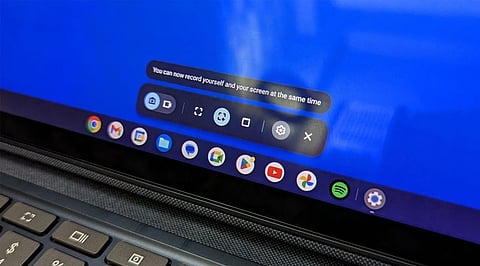
The Screen Capture tool offers another simple route. Press Shift + Ctrl + Show Windows to open the capture controls. A toolbar appears near the bottom of the display.
The toolbar provides options for a full-screen capture, a partial capture, and a window capture. Select the required mode, then follow the on-screen area selection. For a window capture, select the open window that needs the image. ChromeOS then saves the result in the Downloads folder.
The same tool also supports screen recording on compatible ChromeOS versions. The capture toolbar makes the choice clear, so the correct option can be selected before the screenshot starts.
Also Read - How to Take a Screenshot on Any Device: Windows, Mac, iPhone, Android & More
Some Chromebook models have a tablet-style design and physical volume keys. On such devices, hold the Power and Volume Down buttons at the same time. ChromeOS takes a screenshot of the current display.
This method suits tablet mode when the keyboard sits behind the screen or remains out of reach. The captured image goes to the same general screenshot location within the Files app.
Open the Files app and select Downloads from the left side. Recent screenshots should appear near the top, with the newest file easy to spot.
A screenshot can then be moved to another folder, renamed, or opened in an image editor. Right-click the file for available options. Double-click the image to view it at a larger size.
ChromeOS may also show a preview after a capture. Select the preview to open quick actions when available. These options can help with basic edits before the image gets shared or stored elsewhere.
A Chromebook with an external keyboard may not have a dedicated Show Windows key. A compatible keyboard can still support screenshot shortcuts, although the exact key combination may vary by keyboard layout.
For many external keyboards, the Ctrl + F5 shortcut works in place of the standard full-screen screenshot command. If the keyboard has a Chromebook-style top row, the key with the window overview symbol may work directly.
Also Read - MacBook Neo vs. Chromebooks: Can Apple Win the Budget Laptop War?
Full-screen capture offers the quickest way to save everything visible on the display. A selected-area capture gives tighter control over the final image. Window capture works well for a single app or browser window, while the touchscreen method suits Chromebook tablet mode.
These shortcuts keep screenshot work simple and fast. ChromeOS places the captured files in an easy-to-find location, while the Screen Capture tool adds more control for precise captures. The best method depends on the screen area and Chromebook design, so each option has a clear role.
1. Where are Chromebook screenshots saved?
Screenshots are normally saved in the Downloads folder within the Files app.
2. How do I screenshot part of a Chromebook screen?
Press Ctrl + Shift + Show Windows, then click and drag over the area you want to capture.
3. Can I screenshot a specific window on Chromebook?
Yes. Open the Screen Capture tool and choose the window capture option.
4. How do I take a screenshot on a touchscreen Chromebook?
Press and hold Power + Volume Down simultaneously.
5. Can I take screenshots with an external keyboard?
Yes. Depending on the keyboard layout, Ctrl + F5 may work as the full-screen screenshot shortcut.
