
- Insights
- Cryptocurrencies
- Stocks
- White Papers
- Industry
- Geography

In this article, we will explore how to create a Chatbot using IBM Watson assistant. Before that let's understand what actually is a chatbot.
First, let us divide the word "chatbot" into two, so we have "chat" and "bot"
Chat is the process of communicating, interacting and exchanging information. Bot is an application which is programmed to think like humans to do certain tasks without human intervention.
So, interacting or chatting with an AI-based system (Bot) that can understand human language, process it and give reply based on user intent is called a Chatbot.
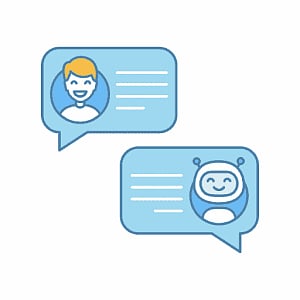
In chatbot, you will not interact with a human but indeed you will interact with a Human-Like software system that can understand your questions and reply you with relevant responses.
Basically, chatbots are classified into two types:
These types of chatbots are predefined with a conversation flow, which has users' inputs and respective responses, they use simple programming logic to answer user queries.
These types of Chatbots use Artificial Intelligence and NLP to understand user queries and answer in a smarter way.
AI-based bots learn continuously from user conversations and get smarter by understanding user preferences.
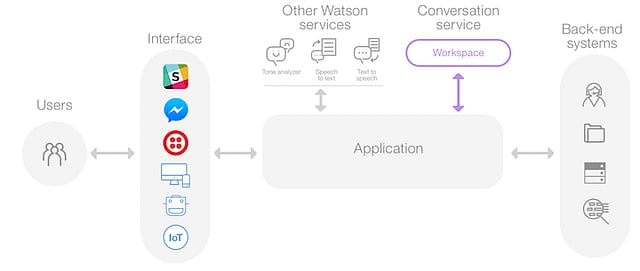
Now let us understand how a chatbot works with the Architecture Diagram below:

In the very first step, user input is given to the AI layer which has an NLP unit and a Decision Engine.
The NLP (Natural Language Processing) unit understands user intent & context i.e what exactly the user is asking for and based on that it converts user input into machine understandable language and processes it to a decision engine.
Decision Engine Based on the NLP output Decision Engine uses machine learning algorithms to decide the bot response and process that response to the NLG unit
NLG (Natural Language Generation) unit as the name suggest converts Machine Language into a plain text or human-understandable language.
And finally, the output of the NLG unit is our Chatbot response which is processed to the user.
Here are the few interesting applications of a chatbot.
Customer Care:
You can build a chatbot that can handle your customer queries within seconds without any service delay.
Book Orders/Appointments/Tickets:
Chatbots can be used to take orders for restaurants, book various appointments like parlor, and book tickets for movies, etc.
Information Bot:
Provides information on specific topics like Tourism, Government Schemes, Share Market info, etc.
Healthcare Assistant:
Healthcare Assistants continuously monitors our health conditions and give suggestions, tips to improve our health conditions.

IBM Watson Assistant is an AI service in IBM Cloud that lets you build, train and deploy Chabot over the cloud.
Anyone can build a Chatbot.
You need not have any sort of technical experience to build a chatbot using IBM Watson Assistant. The intuitive interface helps you to easily create dynamic conversational flows.
Powered by NLP
The service uses NLP strategies like Intent Classification and Entity Recognition to understand user Intent and Context.
Connect anywhere
Watson's assistant provides API's to integrate your chatbot to your custom Application it may be Mobile/Web/Desktop and you can also integrate into various channels like Facebook messenger, Slack, Twilio, etc.
Note: To follow this tutorial you need an IBM Cloud Account, so if you don't have, go to www.cloud.ibm.com and create one.
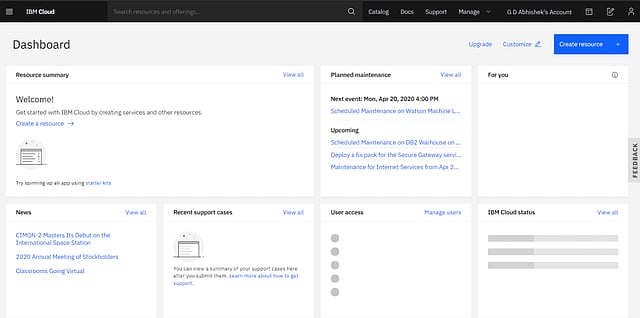
Step -1: Go to www.cloud.ibm.com and login to IBM Cloud.
Step -2: Once you have logged in you can see an empty dashboard as shown below. The dashboard is the place where you can find the services which you have already used/created.
So, let's create IBM Watson Assistant service.
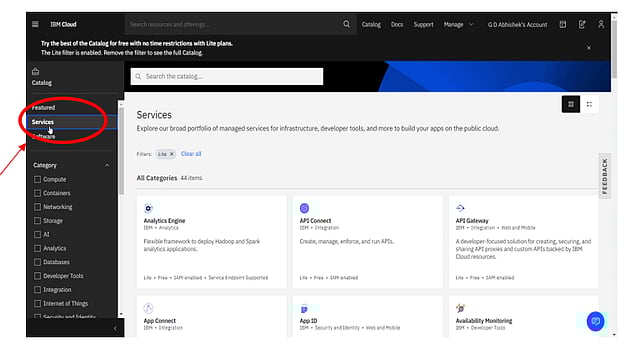
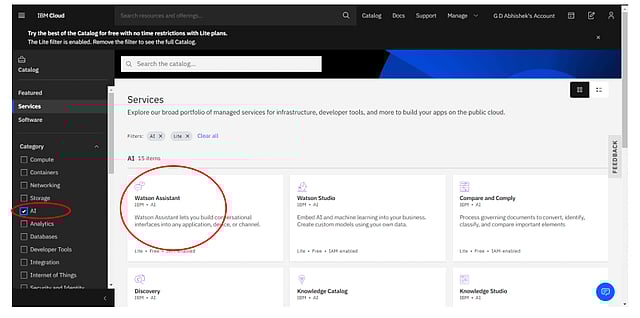
Step -3: Go to Catalog, where you can find all the services provided by IBM Cloud.
Step -4: Go to Services.
Step -5: Select AI and open Watson Assistant Service.
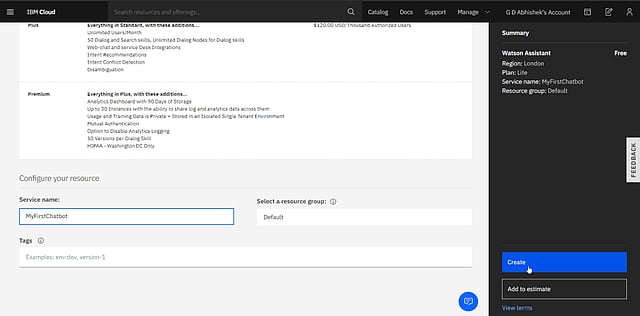
Step -6: Scroll down and give a name to your service and click on Create.
Step -7: Click on Launch Watson Assistant to launch assistant tool to build and train your chatbot.

Now Watson Assistant tool will be launched where you can see Assistants and Skills.

Assistants: You can use assistants to integrate your chatbot into various channels.
Skills: Skills is where you can create and train your conversation flow, for your Chatbot.
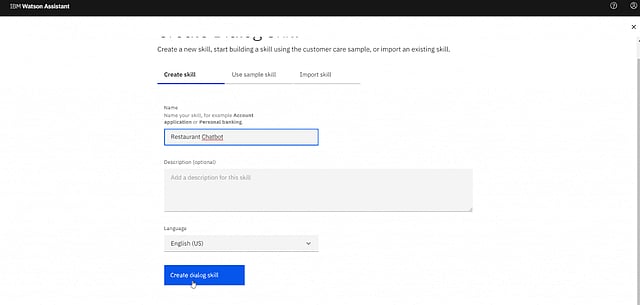
Step -8: Go to Skills and select Create Skill.

Step -9: Select Dialog Skill and click Next.

Step -10: Give a name to your Skill (Chatbot), the description is optional and finally choose Create dialog skill.
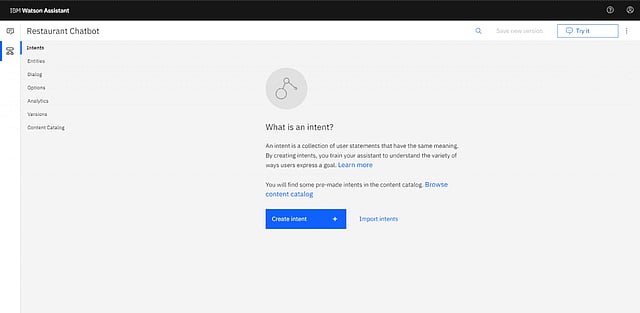
You will be on this page after creating a dialog skill
So now let's see how to implement our conversation flow for Restaurant Chatbot.
First, let us understand a few terms.
Intents: Intents are user examples or user questions. Goals that you anticipate your users will have when they interact with the service.
Define one intent for each goal that can be identified in a user's input. For example, you might define an intent named enquiry that answers about enquiry. For each intent, you add sample utterances that reflect the input customers might use to ask for the information they need, such as, what are the special dishes today?
What are the offers available? etc.
Entity: Entities are used to recognize keywords in the user questions. For example, an entity may be asking about Menu in enquiry Intent that helps your dialog to distinguish what is the exact enquiry about a restaurant.
As you add training data, a natural language classifier is automatically added to the skill and is trained to understand the types of requests that you have indicated the service should listen for and respond to.
Dialog: We will use Dialog to build a dialog flow that incorporates your intents and entities. The dialog flow is represented graphically in the tool as a tree. You can add a branch to process each of the intents that you want the service to handle. You can then add branch nodes that handle the many possible permutations of a request based on other factors, such as the entities found in the user input or information that is passed to the service from your application or another external service.
So, first, we will create a greeting intent to make our chatbot to greet our customers.
Step -11: Click on Create Intent for creating a greetings intent.
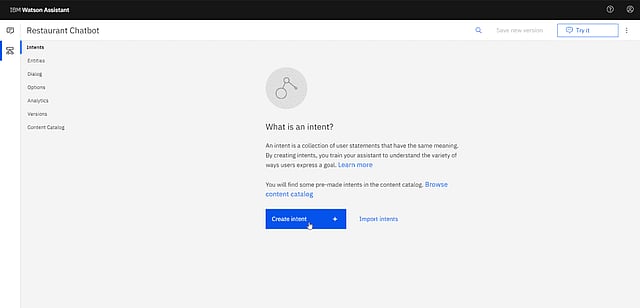
Note: Intents are denoted by #
Step -12: Give a name to intent, you can give any name eg: "Greeting" and click on "Create Intent".

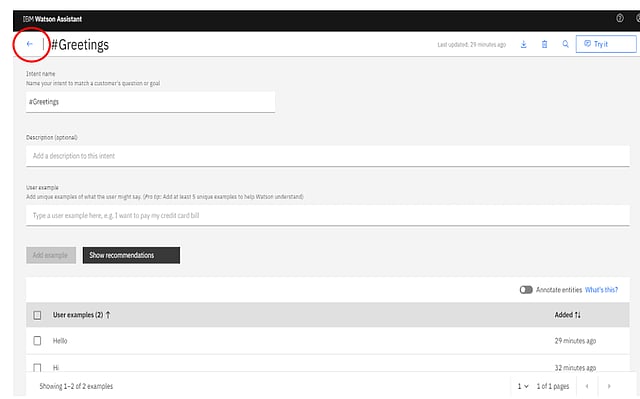
Step -13: Add sample User examples, for greetings and click on add example

Step -14: You can add multiple user examples as shown below Eg: Hello, Hola, etc.
Note: It is recommended to add at least 10 user examples to get good accuracy.

Step -15: Once you have added your examples, click the back button.
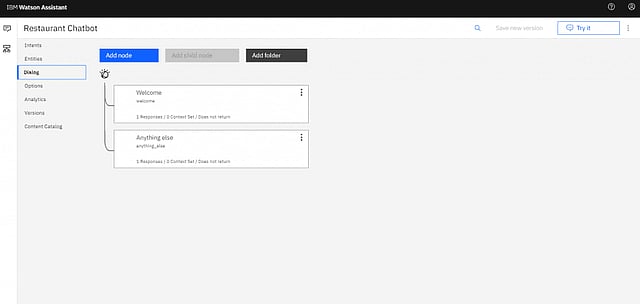
Step -16: Go to Dialog to add bot responses to greetings Intent.

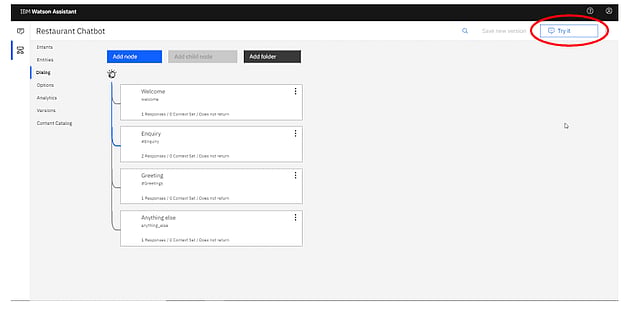
This is the following interface you see after you go to the dialog.
Note: Welcome and Anything else nodes are the inbuilt nodes that have their own functionality. Welcome node is triggered during the start of our conversation, and Anything Else node is triggered when the user question is irrelevant.
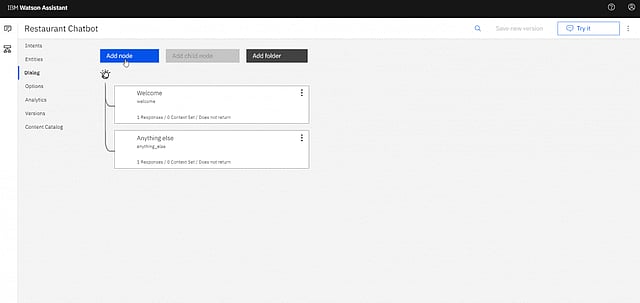
Step -17: Click on Add node to add a new custom node for Greetings.
Step -18: Give a name to the node and then type #Greetings in the Enter condition field of this node and choose #Greetings option.

Step-19: Add sample responses and close the node as shown below.
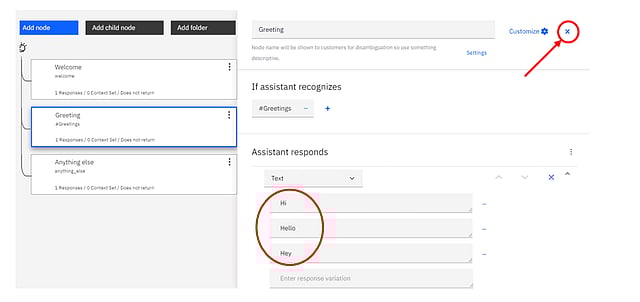
Note: Here you can add any bot responses, which will be triggered when user question is from greeting intent.
Step – 20– Now let's test the basic conversation we have developed. Click the "Try it" icon to open the "Try it out" pane.
The welcome message in the welcome node is displayed.
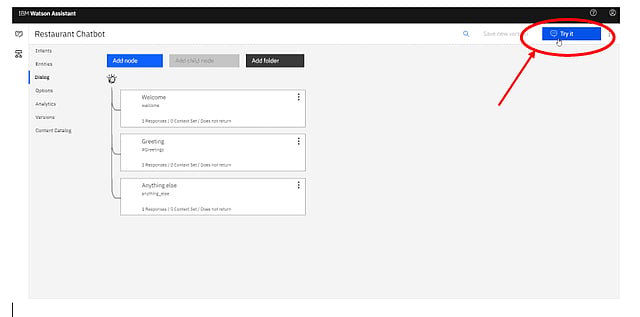
Step:21–Test the chatbot by giving a sample input in the "Try it out" pane Eg:Hi, Hello.

So, we are done building a Basic greetings chatbot.
Now let's create an enquiry system, where our bot can answer various user enquiries about our restaurant.
Gather as many customer questions inputs as possible. Using input from real users gives a better picture of the expected input than having experts create lists of possible utterances. Remember that customers might phrase the same kind of request in many different ways.
Eg:
Enquiry
After gathering all possible questions asked by a customer we can proceed to build an enquiry system.
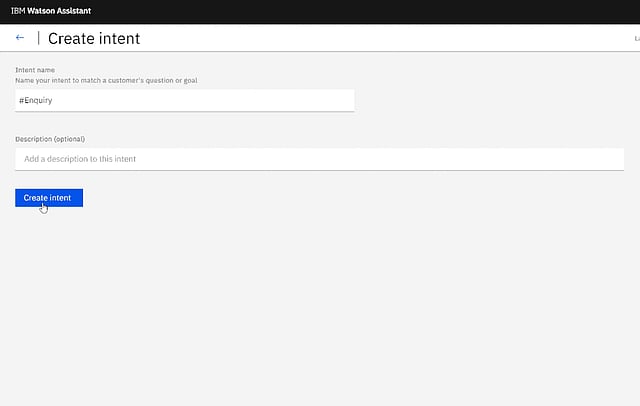
Step:22–Let's create an intent for Enquiry. So, go to Intents and click on "Create Intent".
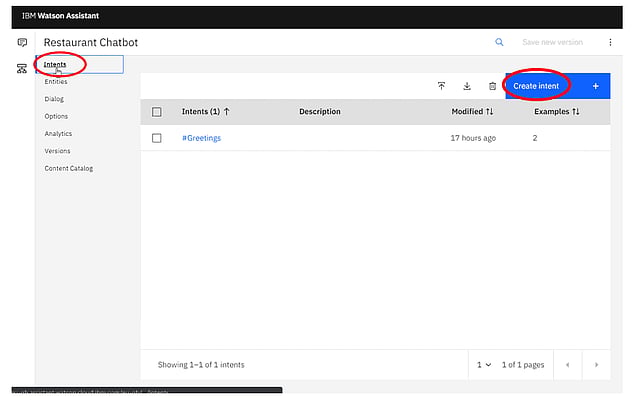
Step – 23: Give the intent name as Enquiry and click on Create intent.
Step – 24: Add a few sample user questions/examples for restaurant enquiry.
Eg:

Now let's add entities i.e keyword recognition to understand user context, i.e whether the user is asking about offers or menu or cost, etc.
Step – 25: Go to Entities

Step 26: Click on Create Entity
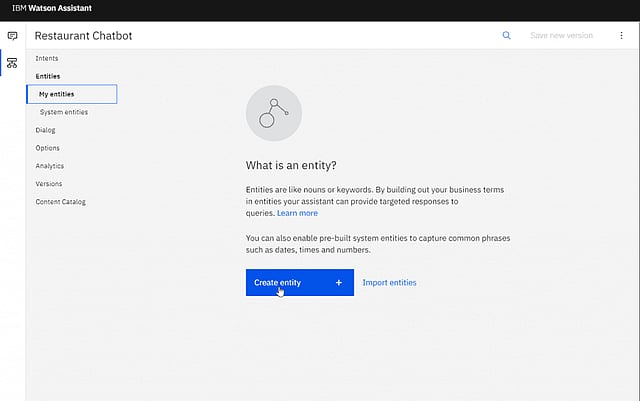
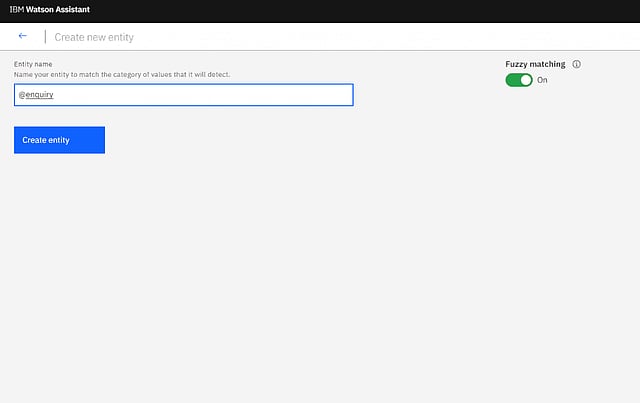
Step -27: Give any name to your entity and click on Create Entity
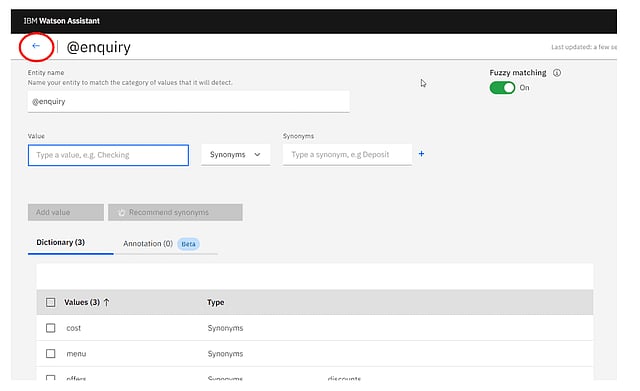
Step-28: Add offers as keyword and respective synonyms i.e how a user can ask in a different way eg: discounts and click on Add Value

Step-29: Add a few more keywords like menu, cost with respective Synonyms, etc.

Step-30: Once you have done adding all the keywords you can go back.
Step-31: Go to Dialog.

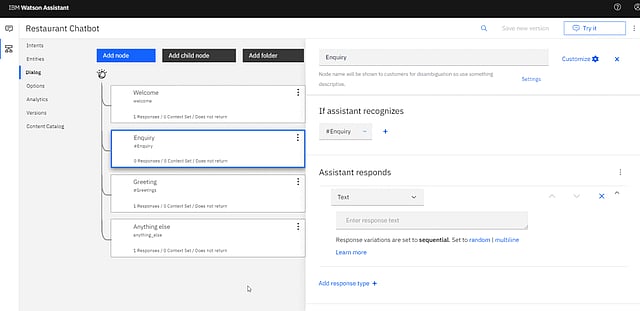
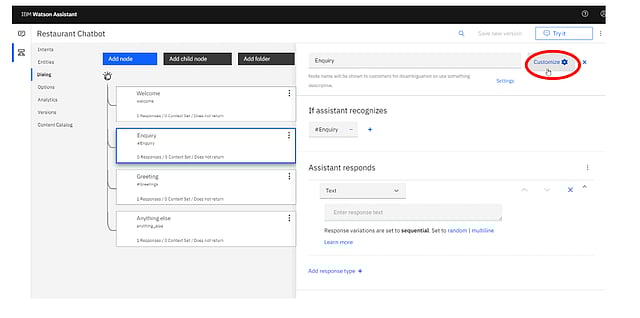
Step-32: Click on Add Node to add responses for enquiry.
Step-33: Give a name to the node and Enter Condition as #Enquiry.
Note: Now we have to recognize the keywords in the intent i.e we have to understand the user context
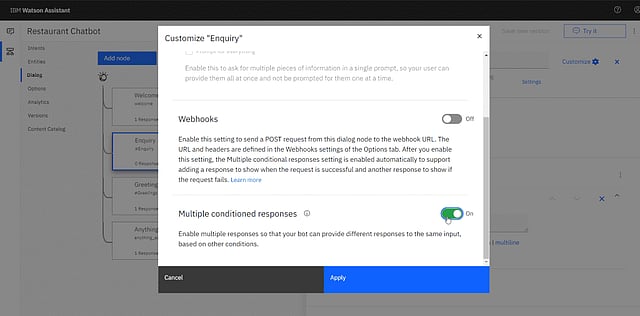
Step- 34: Click on Customize to recognize keywords and add specific responses.
Step- 35: Enable Multiple Conditioned Responses and click on Apply.
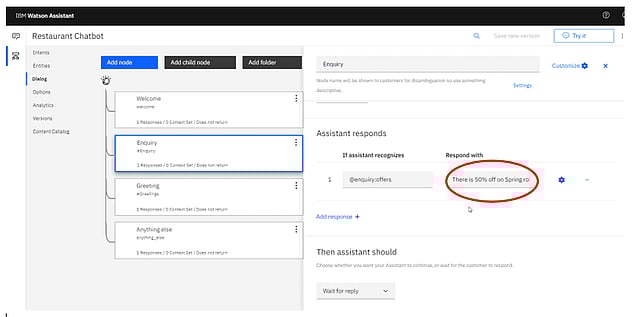
Step- 36: In the internal condition enter @enquiry to recognize the entity.
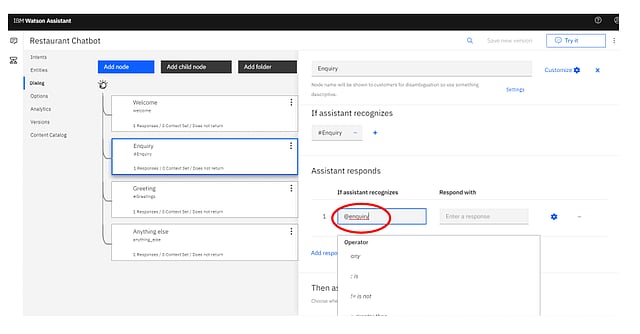
Step-37: Select is from the drop-down.
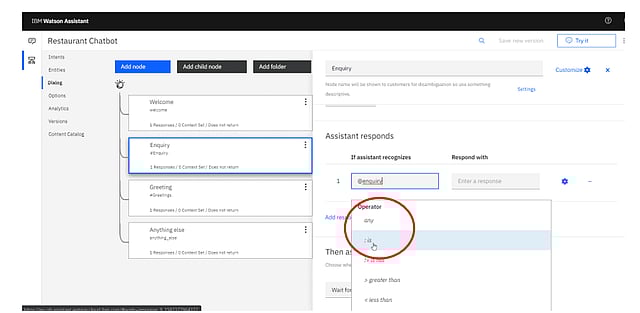
Step-38: Choose offers from the drop-down.

Here we are specifying the response to be given by the bot when a user asked about offers.
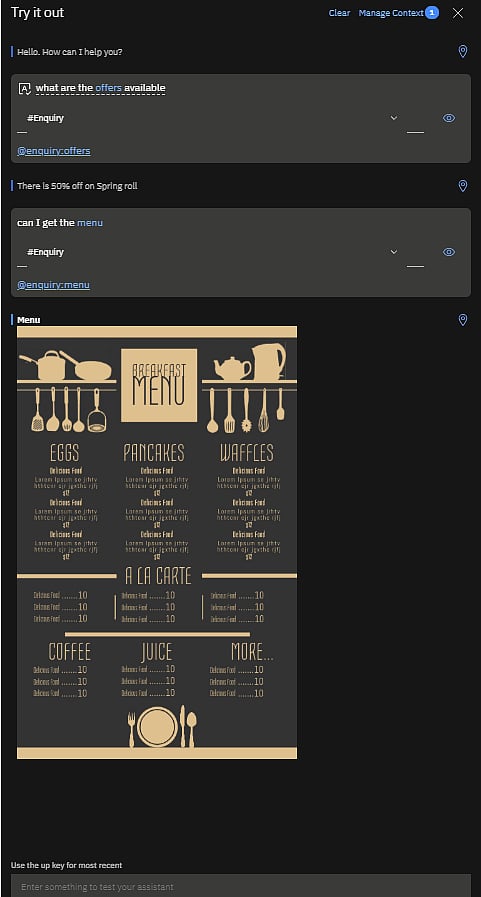
Step-39: Enter a sample offer in the response as shown below Eg: There is 50% off in Spring roll.
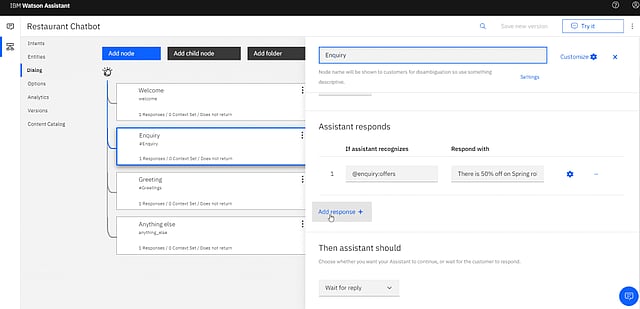
Step-39: Click on Add response to add a response for menu keyword.
Step-40: Now enter @enquiry:menu in the second condition to give response for menu.
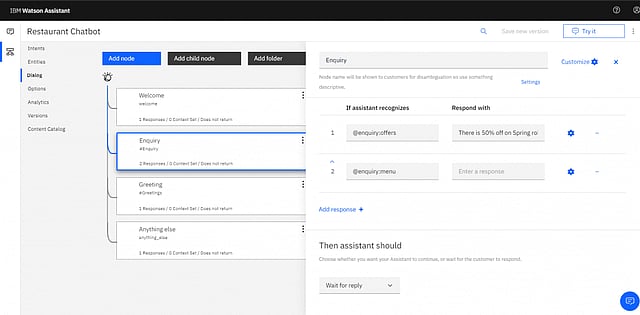
Note: Now let's give an Image (Menu) response when menu keyword is triggered.
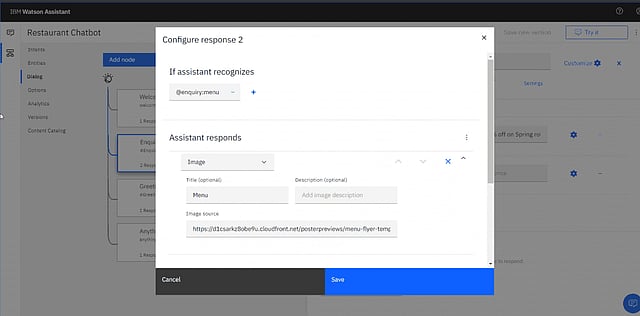
Step 41: Click on the Settings icon to customize the bot response.

Step 41: Now, Select Image as a response type to give a menu image.

Step 41:Here give the Title as Menu and in the Image source give the .jpg link of any menu image Eg: https://d1csarkz8obe9u.cloudfront.net/posterpreviews/menu-flyer-template-5632286b490608db0301a085b91cde86_screen.jpg and click on save
Step 42: We are done building a basic enquiry system which can answer a few user quires, now you test your chatbot in the "Try it".
You can see the response of my bot here:
So, now we have built a chatbot using IBM Watson Assistant, you improve this by adding more intents, entities and dialog.
And also you integrate your chatbot to external channels like facebook, slack etc..
Interested to learn more about chatbot development and integrations? Checkout SocialPrachar's mastery course on Chatbot Design and integration using Natural Language Processing. Enroll Now(https://socialprachar.com/artificial-intelligence-course-training-hyderabad/)
